Create backups with Velero
Introduction
Velero is an open source tool to perform backups of your Kubernetes clusters, this also includes your kubernetes volumes! The way Velero works, is by asking the Kubernetes API for the desired manifests you want to backup, that way you do not need a direct access to the etcd Database. This is very useful when you are using managed Kubernetes clusters like AWS, GCP, Digital Ocean etc. As when using managed clusters you do not have direct access to the masters nodes.
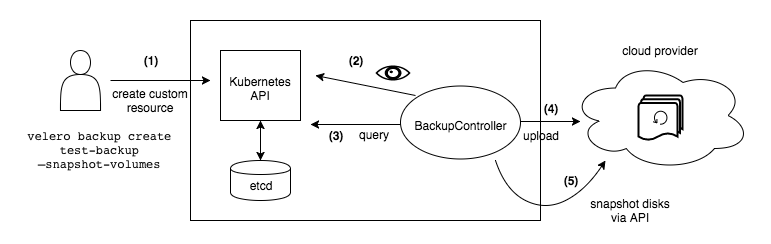
As described in the diagram above, the user creates a Velero backup resource, then the Velero controller installed on the cluster ask the Kubernetes API and preform the backup for the desired resources. The Backup data can be then uploaded into a S3 Bucket or any other backup location.
Restoring from a backup is very similar. When the user creates a restore resource, the velero controller picks it up, download the backup data and restores it into the cluster. The good thing here is, Velero perfroms a non-destructive restore, meaning it won’t delete any existing resource on the cluster and skip those.
If you want to know more how Velero works, click here.
Pre-requisites
Before to use Velero we need:
- Of course our own Kubernetes Cluster which for testing purposes you can use Kind.
- A S3 Bucket to store our Backups. Here we will use MinIO.
- The Velero Client. This is in my opinion the easiest way to install, create and restore backups with Velero.
MinIO
This is a simple docker-compose which deploys minio. Copy this file and run docker-compose up
# docker-compose.yaml
version: '3'

services:
  minio:
    image: quay.io/minio/minio:latest
    command: server /data --console-address ":9001"
    environment:
      - MINIO_ROOT_USER=admin
      - MINIO_ROOT_PASSWORD=password
    ports:
      - "9001:9001"
      - "9000:9000"
    volumes:
      - /data
Go to http://localhost:9001 and login with admin/password and create a bucket like velero-backups
Velero Client
Download latest Binary and extract it:
tar -xvf <RELEASE-TARBALL-NAME>.tar.gz
move the velero binary to your bin (/usr/local/bin) folder or add it to your $PATH.
Install Velero in your cluster
The default installation from Velero requires a storage location. In this case as we are using MinIO, create a file called credentials-velero with the username and password from MinIO:
# credentials-velero
[default]
aws_access_key_id = admin
aws_secret_access_key = password
NOTE: In the Cloud, you must have a real accessKey and SecretKey with the right permissions in order to access your bucket. Additionally depending on the Cloud you are using, there is a list of supported providers here. As MinIO is a compatible AWS S3, we are using there the Velero plugin for AWS.
Install velero by setting the provider, plugin, secret-file and the backup location configurations:
velero install --provider aws --bucket velero-backups --plugins velero/velero-plugin-for-aws:v1.4.1 --secret-file ./credentials-velero --use-volume-snapshots=false --backup-location-config region=minio,s3ForcePathStyle="true",s3Url=http://localhost:9000 --use-restic
This will install the Velero controller on your Cluster under the namespace velero. For this example we are using also the restic integration, which makes possible to make backups of our volumes.
TIP: Velero can also create Snapshots of your volumes if using a supported Cloud provider. that way you will not need the restic integration.
Create a backup
With the Velero client you can create different types of backups. The fastest way to backup is to create backups per namespaces:
velero backup create <Backup Name> --include-namespaces <namespace1,namespace2,...,namespaceN>
This operation will not backup Volumes by default, in order to do so, we need to make sure to add the annotation backup.velero.io/backup-volumes=<volume-name-on-thepod> to the Pods where a volume is mounted.
e.g: we have a rabbitmq pod with a volume:
apiVersion: v1
kind: Pod
metadata:
  annotations:
    backup.velero.io/backup-volumes: persistence
  labels:
    app.kubernetes.io/component: rabbitmq
  name: rabbitmq-server-0
****
  volumes:
    - name: persistence
      persistentVolumeClaim:
        claimName: persistence-rabbitmq-server-0
In this case we would need to annotate kubectl annotate pod rabbitmq-server-0 backup.velero.io/backup-volumes=persistence so the Velero backup will also safe the Volume data.
Backup schedules
It is also possible to setup recurrent backups using schedules, in this example we create a recurrent backup every Saturdays at 23:00 including some namespaces, with a backup validity of 21 Days. This means, backups older than 21 Days will be eliminated from the storage location and also from the backup list saved on the Cluster.
velero schedule create sat-23uhr --schedule="0 23 * * 6" --ttl "504h" --include-namespaces namespace1,namespace2,namespace3
After the schedule is in place, you can see a list of backups created by doing:
velero backup get
To check information about the backup schedule created before:
velero schedule get
Restore a backup
In order to restore a backup:
velero restore create --from-backup <backup-name>
To know which backups you have:
velero backups get
If you want to support me, buy me a coffee.